Battery Calibration
Admin Hub → Robots → Operation → Current Robot → Advanced → Battery calibration
Use this page when the robot’s reported battery % does not match how long it actually runs. Calibration builds a curve from voltage. Skip it if the reported % is already accurate.
Needs the manage device permission in the company that operates the robot, or in the manufacturer company. Copy saved to robot model is manufacturer-only (Manufactured robots).
1. Record a discharge
- Charge the robot to full.
- Leave it stationary and let it run down to empty. Driving or lifting makes a jagged trace that does not fit well.
- Do not put it on charge partway through.
- Keep the robot online so readings reach the cloud.
2. Fit the curve
Open the robot → Advanced → Battery calibration.
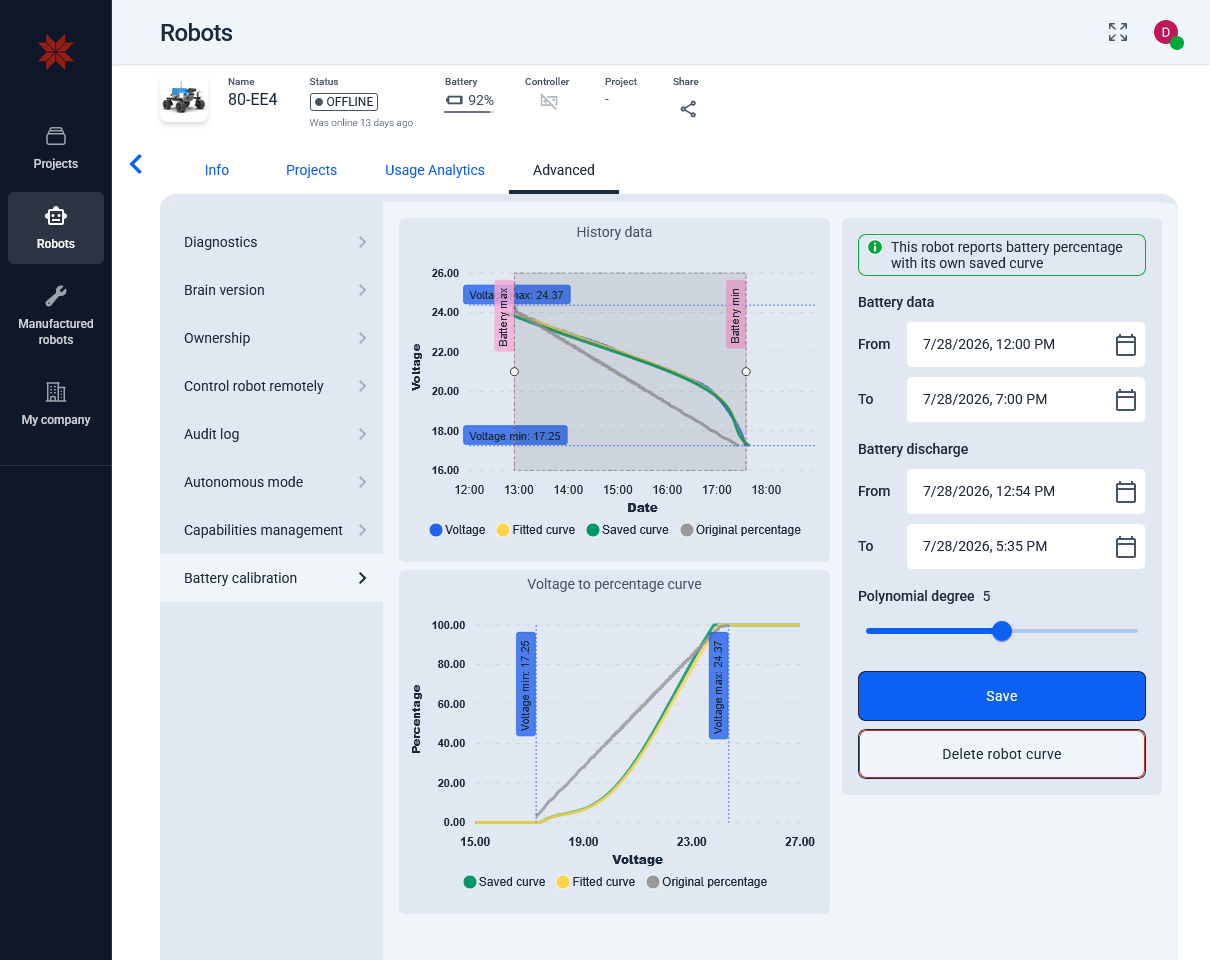
- Battery data — set the From and To date and time for the start and end of the discharge.
- Battery discharge — the maximum (100%) and minimum (0%) charge limiters. Drag the sliders on the chart to the start of the blue Voltage drop (full) and to the end of the drop (empty).
- Polynomial degree defaults to 3. If the curve does not match the needed shape, change the value until it is close to this:
- History data chart — the yellow Fitted curve and the blue Voltage overlap as much as possible.
- Voltage to percentage curve chart — the yellow curve:
- before the Voltage min cutoff, a straight line at 0%
- after the Voltage max cutoff, a straight line at 100%
- Click Save. The curve is stored for this robot.
Degrees above 6 overfit noise and swing off just outside the recorded voltage range. If 5–6 still miss the readings, record a cleaner stationary discharge.
3. Check against a longer history
After saving, widen Battery data to cover several days or weeks. This does not touch the curve, it just shows more history — including the highest and lowest voltage the robot has actually reached over that period, marked as Voltage max and Voltage min.
Compare those markers with the saved curve in the bottom chart:
- If the real voltages fall inside the range the curve covers, the calibration holds up.
- If the robot has been running at voltages below where your curve reaches 0%, it works past what the calibration knows about — record a discharge that runs closer to truly empty.
- If it has reached voltages above the curve's 100% end, the discharge you fitted did not start from a genuinely full battery.
4. Robot model (manufacturer)
Copy saved to robot model makes this robot’s saved curve the default for every robot of that model that has no curve of its own. Save this robot first — the button stays disabled until then. A robot’s own curve always wins over the model curve.
The model’s Battery calibration page can Delete the model curve (with confirmation).
5. Remove a robot curve
Delete robot curve removes this robot’s curve (with confirmation). It then uses the model curve if there is one, otherwise the robot’s own percentage.
If the curve looks wrong
| Symptom | Likely cause |
|---|---|
| Curve dips somewhere instead of rising | Polynomial degree too high, or the discharge range covers a charging break. |
| Curve is jagged, or swings sharply just outside Voltage min / Voltage max | Polynomial degree too high — lower it, and keep it at 6 or below. |
| Curve is not at 0% at Voltage min, or not at 100% at Voltage max | The discharge range edges are not on the real full and empty points. |
| Curve flattens at 0% or 100% | The fit went outside the valid range and was clamped there. Lower the degree. |
| Fitted curve only matches part of the readings | The discharge range covers only part of the slope. |
| Percentage still wrong after saving | The recorded discharge did not start from full or did not reach empty, so the missing end was guessed. |
| Voltage trace is noisy and hard to fit | The robot was moving or working during the discharge. Record again with it stationary. |